I tried to follow the first half of “Scale ASP.NET Core Apps with Docker Swarm Mode” tutorial but I encountered lots of errors because that tutorial was written for a preview version of .NET Core, 1.0.0-preview2-003121. To save you from the errors, here is a guide to that same tutorial but for ASP.NET Core 3.1 using Visual Studio 2019.
Windows 10 prerequisites:
Step 1: Create ASP.NET project
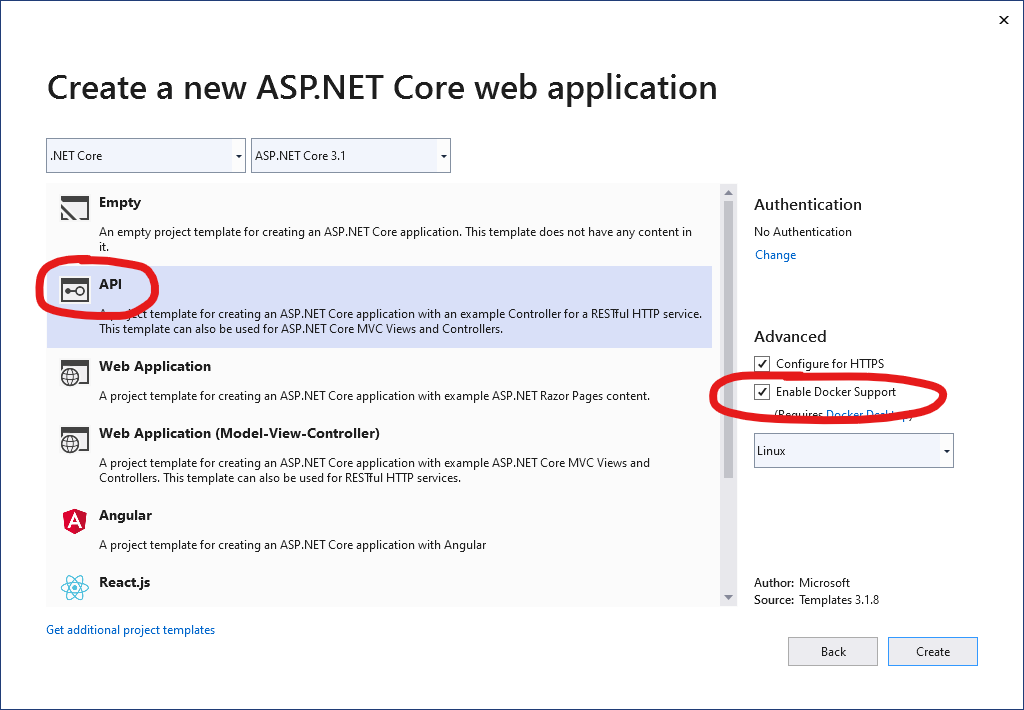
Using Visual Studio 2019, create an ASP.NET Web API project named TokenGen.
Be sure to “Enable Docker Support” by clicking on the chechbox as shown in the image below.
It will create a Dockerfile with these contents:
FROM mcr.microsoft.com/dotnet/core/aspnet:3.1-buster-slim AS base
WORKDIR /app
EXPOSE 80
EXPOSE 443

FROM mcr.microsoft.com/dotnet/core/sdk:3.1-buster AS build
WORKDIR /src
COPY ["TokenGen/TokenGen.csproj", "TokenGen/"]
RUN dotnet restore "TokenGen/TokenGen.csproj"
COPY . .
WORKDIR "/src/TokenGen"
RUN dotnet build "TokenGen.csproj" -c Release -o /app/build

FROM build AS publish
RUN dotnet publish "TokenGen.csproj" -c Release -o /app/publish

FROM base AS final
WORKDIR /app
COPY --from=publish /app/publish .
ENTRYPOINT ["dotnet", "TokenGen.dll"]
(For an explanation on what these Dockerfile contents mean, you can refer to this: “How Visual Studio builds containerized apps (version vs-2019)”)
After the projects is created, go to the Controllers folder and add a new controller named TokenController with the following content:
namespace TokenGen.Controllers
{
    [Route("api/[controller]")]
    public class TokenController : Controller
    {
        [HttpGet]
        public dynamic Get()
        {
            return new
            {
                Guid = Guid.NewGuid().ToString(),
                Expires = DateTime.UtcNow.AddHours(1),
                Issuer = Environment.MachineName
            };
        }
    }
}
(You can see the resulting project in this public GitHub repository.)
Step 2: Create Docker image
Open a command window in root folder of the project created in Step 1 (the folder where the .sln file is located).
Execute this command to build a Docker image named tokengen-img:
docker build -t tokengen-img -f ./TokenGen/Dockerfile .
After that, when you execute
docker images
you will see tokengen-img as one of the images listed.
REPOSITORY                             TAG                 IMAGE ID
tokengen-img                           latest              be76db52e663
mcr.microsoft.com/dotnet/core/sdk      3.1-buster          9ab567a29502
mcr.microsoft.com/dotnet/core/aspnet   3.1-buster-slim     bdca989bc8d3
Step 3: Create Docker container
Execute this command to create and run a container named tokengen based on the tokengen-img image created in Step 2
docker run -d -p 5000:80 --name tokengen tokengen-img
Then execute
docker ps
in the command line.
CONTAINER ID        IMAGE                 COMMAND                  CREATED
4ead1d345897        tokengen-img:latest   "dotnet TokenGen.dll"    9 seconds ago
Take note of the CONTAINER ID of the tokengen container.
Now, open a PowerShell window then run this:
Invoke-RestMethod http://localhost:5000/api/token
You will get a response that looks similar to this:
guid                                   expires                      issuer
----                                   -------                      ------
5b8b8613-b98d-40c1-befe-1531dd6e899b   2020-08-27T08:23:18.82197Z   4ead1d345897
Take note of that issuer. You will see that the CONTAINER ID of the tokengen container is that same as that issuer value.
Now, before going to the Docker Swarm part, stop and delete the container by using the following commands:
docker stop tokengen
docker rm tokengen
Step 4: Use Docker Swarm
First, enable Docker Swarm mode by executing this command:
docker swarm init
Then create a service. (For an explanation of the difference between a Docker container and a Docker service, go here.)
docker service create --publish 5000:80 --name tokengen tokengen-img
Execute this command to check if the service is running:
docker service ls
ID             NAME      MODE        REPLICAS  IMAGE                PORTS
ciofdg2cipr3   tokengen  replicated  1/1       tokengen-img:latest  *:5000->80/tcp
Execute this scale command to run replicas of the application.
docker service scale tokengen=3
Try to execute the command
docker ps
again. It will show 3 tokengen containers:
CONTAINER ID        IMAGE                 COMMAND                 CREATED             STATUS              PORTS               NAMES
7d8d43844153        tokengen-img:latest   "dotnet TokenGen.dll"   34 seconds ago      Up 32 seconds       80/tcp, 443/tcp     tokengen.2.tw1shkml1y0igeqzcp7y5d56e
92ede130d311        tokengen-img:latest   "dotnet TokenGen.dll"   34 seconds ago      Up 32 seconds       80/tcp, 443/tcp     tokengen.3.vwx6vk2y5ft7mvcd84q98ywce
a544a46bf2cc        tokengen-img:latest   "dotnet TokenGen.dll"   6 minutes ago       Up 6 minutes        80/tcp, 443/tcp     tokengen.1.nb2ro0wg7gvaos897o8wq0mj7
Open 3 PowerShell windows and run Invoke-RestMethod http://localhost:5000/api/token:
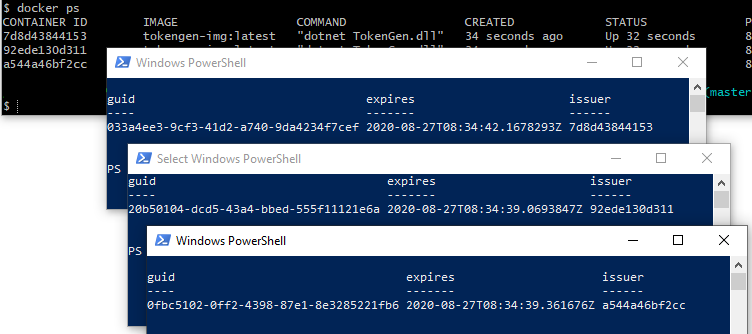
Note that the issuer in the responses have three different values, which corresponds to the IDs of the three replicas of the application.
To delete the service, execute this command:
docker service rm tokengen
That’s all folks.
Update (Oct 11, 2020):
I found a very interesting talk about Docker: “Heresy in the Church of Docker” by Corey Quinn, a Cloud Economist. Watch it if you have time ![]()
References:
